Jump to content

Standard MX vs. O-Ring: How To Choose the Proper Chain for your Bike


Rob@ProX

Chain drive systems have been transferring power to the rear of motorcycles for nearly a century. Here we take a look at the advantages of both standard MX and O-ring chains, and analyze the components they are made up of.


Fun on a motorcycle is dependent upon the motorcycle being propelled forward. Even if you build a way-too-fast dirt bike engine, it won’t do you any good unless that power can be effectively transferred to the rear wheel. Whether a dirt bike or one of the various forms of street motorcycles is the subject, chances are it’s driven by one of three methods: chain, belt, or shaft.

While belt drives require less maintenance, they are not as strong as chains, and it’s more difficult to change the final drive ratio. Shaft drives have been around for a long time, leading up to very innovative designs found on some street motorcycles today, but the cost and weight is much higher, and changing a final drive ratio would be substantially more trouble.

This leaves us with the chain drive. Motorcycles have been using chain drive systems since the early 1920s. Upon analysis of modern performance dirt bikes and sport street bikes, chains drives are the only power transfer systems you’ll find.

826792743_ProXChainDirtBikeTV.jpeg.fc008555b847b9e418aa9534e3f6a6ad.jpeg

Find ProX Chains and Sprockets Here

The motorcycle industry has seen continuous, highly impressive innovation in regards to engine design, fueling systems, suspension, and computer integration, to name a few. Motorcycle technology we couldn’t have dreamed of 30 years ago is commonplace today. So, with all this progress, why are we still using chains and sprockets to transfer all our fuel-injected, smile-creating power to the rear wheel?

The answer is simple: because it works. However, don’t think that the chain drive system has not progressed over the years alongside everything else.

The modern chain you’ll find on just about any dirt bike is technically categorized as a roller chain. These chains are comprised of more pieces than you may think, and they all rely on tight assembled tolerances to function properly. ProX Racing Parts understands the importance of having high quality chain drive components. After all, a broken chain or sprocket means no riding, no performance, and no fun.

Dirt bike roller chains can be categorized into two different types: Standard (MX) and O-ring.

07.RC520120CG-KIT.jpg.9e3b792771b668ef02192694c12407c8.jpg 07.RC520120XCG-1.jpg.c62f73f6bc29d3c63acace750ee7fd32.jpg

Chain Anatomy

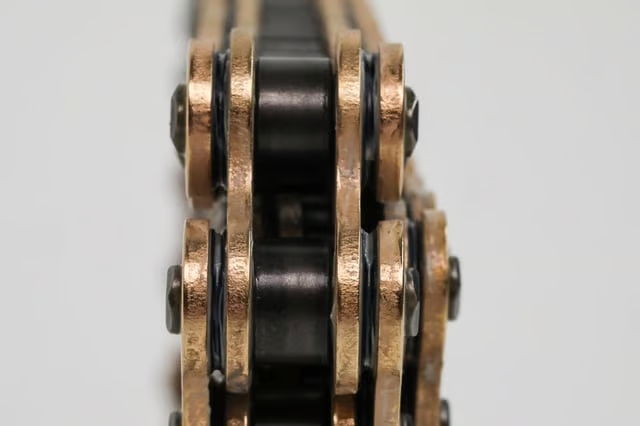
Standard MX chains are comprised of inner links and outer links, assembled with pins, bushings, rollers, and plates. Outer links feature pins, which resemble needle bearings, that are press fit and riveted into chain plates via bushings that rest in the openings of the plates. The pins of the outer links slide through the bushings and rollers of two inner links to meet the mating outer link plate. Repeat this assembly process, and you have your finished, linked chain. O-ring chains share the same anatomy as standard MX chains, with the addition of O-rings.

image.png.177637d2b6426917c476b4430a56420e.png
This break down shows how the pins, bushings, rollers, plates, bearings and O-rings (when applicable) assemble to create a motorcycle chain. A standard MX chain is assembled in this fashion, minus the O-rings you see here.


Each piece plays a critical role, because one failure of one part can snowball into a chain catastrophe. In ProX chains, the chain pins are surface-treated for a hardened outer material layer, increasing wear resistance without compromising the tensile strength of the inner material.

Contrary to what the name implies, the rollers don’t actually roll on the sprockets. Rather, they are the acting component that allows the chain to bend smoothly around the sprockets without creating any binding or breakage from shock. ProX chain rollers are shot-peened, a process involving a metal surface being shot with small particles to better align the molecular structure of the metal, increasing strength and surface stress-resistance.

image.png.07ad62d53be52d5fa14e234bbac9f3ac.png
The rollers of the chain are the larger dark, metal pieces resting between the links. ProX rollers are shot peened for added strength and wear resistance.


ProX chain bushings, rollers, and inner and outer plates are all heat treated to further increase the tensile strength, friction, and wear-resistant qualities of the Japanese steel.

While chains are the best overall drive option in regards to strength and ease of ratio change, they are not always the lightest in weight. ProX chains’ inner link plates are designed with a weight saving shape, as well as machined with a lightening hole, which adds up to a 3% weight savings overall on a complete chain.

image.png.0f3a14e1e158e6bfb0c58dca612a5761.png
ProX chain inner link plates are machined in a weight-saving shape with a lightening hole in the center. This adds up to approximately a 3% weight savings.

O-Ring Chains


The O-rings encircle the pin bushings, and rest between the outer link and inner link plates. This seals chain grease in the pins and rollers, maintaining better lubrication for longer. Because of this, O-ring chains have a reputation of lasting anywhere from 1.5 – 2 times longer than standard, non-O-ring chains.

Common criticism of O-ring chains has been that the increased friction in the movement of the chain from adding rubber O-rings creates more drag and translates less power to the rear wheel. While this is true to a certain extent, there are ways to reduce the amount of friction added.

image.png.0fd78c3f98e735cf03fd72387b4c0c98.png
O-ring chains have rubber O-rings that sit between the inner and outer links, sealing in grease for inner chain components.

Dubbed the X-Ring chain, ProX’s O-ring style chain offering features a QX-style O-ring. QX refers to the specific shape of the O-ring, which results in less rubber surface area touching the chain plates, while still sealing in grease. ProX X-Ring chains operate with approximately 40% less friction than a comparable O-ring chain.

image.png.2dda3245e6ac3c53ef61771404cfc0fb.png image.png.da4811ac77dca1668ed80793492c732f.png
ProX X-Ring chains utilize QX-style O-rings, allowing for less friction during operation, while still sealing in grease for long life.


Find ProX Chains and Sprockets Here

Gold Chain vs. Standard Chain

Whether you run a standard MX chain or and O-ring chain, ProX chains are available in both gold and standard steel color. The gold color comes from a surface coating that is more resistant to rust than plain steel. Steel chains can rust from water encountered while riding, washing the bike, moisture in the dirt, or simply from moisture in the air while sitting for a long time. Rust can be prevented on standard steel with proper chain maintenance (keeping them lubricated, coated, and clean), but gold chains will be much less sensitive to quick rust. Regardless of the style, proper chain maintenance is always encouraged.

Should I Use a Standard MX Chain or an O-Ring Chain?

This is the million-dollar question when it comes to a rider choosing a chain for their motocross bike, and you will likely get a million different answers. O-ring chains do have more drag than a standard MX chain, there’s no doubt about it. While the ProX X-Ring reduces the amount of extra drag, it’s still there.

All riders are different. Some say they can feel a big difference in the bike’s power when riding with an O-ring chain versus an MX chain, while others will say they don’t notice it all. Ideally, it would be best to try both, to see which chain has the feel you prefer.

If you don’t mind that the O-ring chains have a little more drag, or if you’re on a budget, the X-Ring chain is likely the best choice for you. You will get at least 150% more life out of it, and the amount of power you have to sacrifice from friction is lessened.

If your main focus is racing performance, and more frequent chain maintenance is part of your schedule, stick with the standard MX chain, and reap the benefits of the strength and wear resistance of ProX chains.

Another common problem observed with chains is what most call stretching. Technically, the chain doesn’t stretch. Rather, it is considered elongation, where material wears out, and parts of the chain start to operate outside of their original tolerances, ultimately leading to lengthening of the chain assembly.

ProX chains are stress tested before going in the box, to reduce any large length differences once the new chain gets broken in.

Don’t let chain maintenance slip past you, a broken chain will ruin anyone’s riding day. Stay on top of your lubrication and cleaning practices, and when it’s time to replace your chain, do your research and choose the chain that best fits your purpose and budget.

image.png.ec99ced5b8b28ac827a6108e42c6b72e.png

image.png

  • Like 7
  • Helpful 1

User Feedback

Recommended Comments

A friend and I disagree.  He says you do not need to lube an  X or O ring chain.  I say the rollers and the X/O rings both will last longer if lubed occasionally.  What you guys say??

Edited by Weezer the Geezer
  • Angry 1
Link to comment
Share on other sites

Even the o-rings or x-rings appreciate some lube to keep them pliable. It's also nice to have some slippery stuff between the roller and sprocket teeth. Bel-Ray chain lube is my go-to.

Periodically I have applied synthetic gear oil from a squirt can to the OEM chain on my AT. Then I wipe off the excess. It's amazing how easy the wheel spins and the chain just sounds so smooth when rotating the wheel. That OEM chain is pushing 34k miles now.

Link to comment
Share on other sites

About cleaning the motorcycle chain, I also have some content to share.

first gather these supplies: chain cleaner, a brush, rags, and chain lubricant. Park your bike on a stand to access the chain easily.

  • Preparation: Put the bike in neutral and ensure it's stable.
  • Initial Cleaning: Spray the chain with a chain cleaner. Let it sit for a few minutes to break down grime.
  • Scrub: Use a brush to scrub the chain, focusing on all sides. Rotate the wheel to clean the entire length.
  • Rinse and Wipe: Rinse off the cleaner with water or wipe it away with a damp cloth. Dry the chain thoroughly with a clean rag.
  • Lubricate: Once the chain is dry, apply chain lubricant evenly. Let it sit for a few minutes to penetrate the links.
  • Final Check: Wipe off any excess lubricant to prevent dirt attraction.

Perform this maintenance regularly for a smooth and long-lasting chain.

I got and analyzed from this article I read today: How to Clean Your Motorcycle Chain(Top Motorcycle Maintenance Tips 2024)

  • Helpful 1
Link to comment
Share on other sites

You can get a Japanese-made RK o-ring chain for $60.   Standard chains and aluminum sprockets are for pro racers $$$ who like to adjust their chain all the time and replace sprockets.  I lube the rollers on my o-ring chain with a bit of dry wax lube such as DuPont Teflon chain saver so it doesn’t collect grit.  You can clean it with kerosene which is a very mild solvent. 

  • Helpful 1
Link to comment
Share on other sites

As long as you don't ride under really wet and muddy conditions probably even combined with wet clay you can use any o-ring or x-ring chain. But under really wet circumtances, riding through water puddels and so one a standard chain is in my experience the better choice. 

Link to comment
Share on other sites

I’ve found when chains get worn out it isn’t the outer parts that are bad it’s excessive wear of the pins and inner roller surface. A stretched chain has excessive play in the pins. Most of the bikes that come in our shop the chain is power washed to death washing out the inner lubrication.

Link to comment
Share on other sites

On 8/31/2024 at 11:22 AM, mcsbest. social said:

About cleaning the motorcycle chain, I also have some content to share.

first gather these supplies: chain cleaner, a brush, rags, and chain lubricant. Park your bike on a stand to access the chain easily.

  • Preparation: Put the bike in neutral and ensure it's stable.
  • Initial Cleaning: Spray the chain with a chain cleaner. Let it sit for a few minutes to break down grime.
  • Scrub: Use a brush to scrub the chain, focusing on all sides. Rotate the wheel to clean the entire length.
  • Rinse and Wipe: Rinse off the cleaner with water or wipe it away with a damp cloth. Dry the chain thoroughly with a clean rag.
  • Lubricate: Once the chain is dry, apply chain lubricant evenly. Let it sit for a few minutes to penetrate the links.
  • Final Check: Wipe off any excess lubricant to prevent dirt attraction.

Perform this maintenance regularly for a smooth and long-lasting chain.

I got and analyzed from this article I read today: How to Clean Your Motorcycle Chain(Top Motorcycle Maintenance Tips 2024)

The only thing i would change from the above correct process, is instead of drying with a cloth, use WD-40 and roll the chain twice or three times with it from both sides (leftbound/rightbound) ensuring that the WD will get in the rollers.

WD stands for Water Dispersant and its main job is not to lubricate but to break down the water.

Then, let the chain dry on its own (roll the wheel some too for water to be thrown out by centrifugal force) and you are free to park the bike and lubricate it before your ride. the WD lubrication is enough for storage.

There's no water on it now for the chain to rust within or without. WD took good care of it all.

If you want to lubricate earlier and store with lubricant on (you don't have to), just make sure you allow the WD to kick off all the water (spin the wheel much before lubrication)

Drying with a cloth alone will not get the water out of the rollers.

P.S. you NEED to do this process on a NEW chain to get rid of all the STICKY maintenance grease it has in the box. This is not a riding lubricant but a storing one, and if used on dirt it attracts it within the chain and destroys it way before its time.


(My resume: 25 year experience & rides, +5 years in racing)

On topic:

Always preferred O, X-ring chains for enduro for 250cc+ bikes, but on my YZ 125x i choose the non-drag side of things (MX gold chain) to squeeze any pony that i can out of its narrow barn. Easier to get the WD inside the rollers without orings too. on a 250cc+ the drag of rings is negligible.

Edited by Leras7
Link to comment
Share on other sites

In my eyes it depends on bike on farm bikes I just use mx chains and clean them with a water blaster and dump them in a 20l bucket of used engine oil for a day and knock links out as it stretches. As for race bikes as above by others

  • Like 1
Link to comment
Share on other sites

For occasional use or racing a standard chain is fine, for longevity or low maintenance a sealed chain is a must. I usually keep bikes for many years/miles and before sealed chains became popular I usually changed chains annually and sprockets at least every two years. They were oiled and adjusted religiously but still wore out in short order. Now sealed chains last for many years with little maintenance or adjustments. My current big bore dual sport is 15 years old with approx. 20000 km on it and rear aluminum sprocket is near the end of it's life but chain is still serviceable. I will be changing both sprockets and chain this winter and new kit will probably last life of the bike. Had a 400cc dual sport for 10 years and 35000 km previous to this one and it also required new chain and sprockets around the 20 K mark. Been dual sporting since 1970.

Edited by willie
Link to comment
Share on other sites


Create an account or sign in to comment

You need to be a member in order to leave a comment

Create an account

Sign up for a new account in our community. It's easy!

Register a new account

Sign in

Already have an account? Sign in here.

Sign In Now

  • Similar Content

    • By Rob@ProX
      Many engine failures can be potentially prevented by knowing what signs to look for when maintaining your 4-stroke. We put together 10 tips to help you know when your engine may need a little extra attention.
      All too often in the motorsports community we here stories of engines blowing up in spectacular fashion. These are gut wrenching tales of catastrophic engine failures that are often shared among friends, online, and bench raced as a form of universal currency. Whether its a rod exiting through the side of a crankcase, valves imprinting into the piston, or any other major catastrophe, these events illicit fear, confusion, and gratitude among engine owners. Fear that a similar event could happen to them, confusion as to how a massively destructive failure happens in the first place, and gratitude that it is someone else’s problem.

      Nobody wants to end up with a piston looking like this. That's why we put these tips together to help you know when your 4-stroke engine might need some preventative maintenance.
      We’re going to discuss things that can be done preventatively to your four-stroke engine that will greatly reduce the likelihood that you’ll be on the storytelling side of a major engine blow-up experience. Contrary to what you may have been led to believe, engines don’t often suffer catastrophic failures for no apparent reason. There are exceptions, such as running an engine with a defective part, but it’s not the norm. Engines will willingly exhibit a number of signs that failure is around the corner. Being willing to “listen” to your engine and taking the time to perform routine maintenance checks is often all that’s necessary to prevent an expensive disaster.
      We’ll start by reviewing a handful of observation opportunities that can be checked with the engine running, then we’ll get into some things that can be checked diagnostically. 
      Startability
      Does the engine struggle to start when kicked, but is more prone to coming to life when the electric start is used, or when the machine is bump started? Poor starting under normal conditions is not an inclusive sign that the engine is doomed to a spectacular failure, but it is a sign that something is amiss. Carburetion or injection issues are possible, but the bigger potential issue to be aware of resides within the cylinder head. 
      Low Compression
      Lack of compression usually correlates with startability issues. Valves or piston rings that are no longer seating properly may be the cause of the poor startability characteristic. When the valves or piston rings don’t seat properly, the engine doesn’t build good compression, so when kicked, the engine struggles to come to life. Push the machine or use the electric start, and the compression event is shortened via faster rotational speeds, which may be just enough to bring the engine to life. 
      Take notice of how it feels when kicking it through. When you feel less resistance through the kick starter, almost as if you could kick it with your hand, the valves are too tight from wear on the valve train. In some cases, this can be solved with a valve adjustment using a shim kit. However, there's a good chance more items in the head are worn out and need attention.

      Sometimes tight valves and low compression issues can be temporarily solved with a valve adjustment, but there are most likely more worn parts that need attention.
      Find replacement valvetrain components.
      Crankcase Breather
      On many engines, the crankcase breather is vented to the airbox. Oil accumulation in the airbox or observation of a large amount of oil mist blowing out the breather when the engine is revved, is a justifiable concern (the exception is if the bike spent some time running on its side) and should necessitate further investigation. Typically, higher than normal pressures in the crankcase are the cause of oil blowing out the breather. Higher than normal pressures can be the result of poorly sealing piston rings, which allow combustion pressure into the crankcase.

      Keep an eye out for oil exiting the crankcase breather hose, as this is commonly the result of higher than normal pressures, which could mean the piston rings are not sealing properly.
      Smoke After Warm Up
      Blue smoke exiting the exhaust pipe after the engine has warmed is a sign that oil is burning in the combustion chamber. Oil can enter the combustion chamber past the valve stem seals or pistons rings, so if this symptom persists then one of these components may be compromised. White smoke exiting the exhaust pipe after the engine has warmed is a sign that coolant is burning in the combustion chamber. The root of this problem is typically a leaking cylinder head gasket. Find gasket kits and top end components.
      Excessive Coolant Exiting the Overflow Tube
      While it is common for coolant to exit the overflow tube when the bike has been tipped over or when it has overheated, it should not occur regularly. Coolant blowing out the overflow tube is another good indicator of a leaking head gasket.

      Most coolant overflow tubes will lead down and out from underneath the bike. Keep and eye out for steaming coolant coming from the tube. This can be a sign of a bad head gasket if you're not in an overheating situation.
      Coolant Weepage
      Dribbles of coolant exiting the engine around the coolant pump are indicative of a faulty water pump seal. If left unattended, the entire cooling system will eventually empty, causing overheating and an incredible amount of damage. 

      Check around your water pump after operation to make there is no coolant weeping out because of a bad gasket/o-ring. Coolant loss can lead to overheating, which can result in serious engine problems.
      Excessive Top End Noise
      Due to all the moving componentry found within the top end of a four-stroke engine, mechanical noise is often present. Discerning what is normal takes a trained ear and familiarity with the particular engine in question, however, audible cues often present themselves when components wear or clearances loosen up.
      Cam chains whirling around will have a metallic noise associated with them. The intensity of the metallic noise may increase as the cam chain stretches or if the tensioner is not keeping enough tension on the chain. Valve train noise is rhythmic and can increase in intensity as clearances change and as the valve seats and valve faces wear together.
      Find OEM quality cam chains and more.

      he intensity of cam chain noise will increase if you're chain has become too loose for the tensioner to keep proper tension on.
      Now that we’ve covered some of the live engine observations that can be made, let’s shift gears and discuss some more intrusive diagnostic assessments we can perform.
      Engine Oil
      The composition of the engine oil can provide a lot of clues as to what is happening within the engine. For starters, what color is it and what is in it? Oil that appears milky is a good indicator that moisture is finding its way into the oil system. The most common culprit is a faulty oil side water pump seal. Extremely black oil may be due to poor maintenance practices on account of the owner or via combustion byproducts entering the oil stream at an abnormally high rate. Worn piston rings can be held accountable for letting in combustion gases and byproducts.
      A keen eye can spot various metallic particles within the oil itself. Aluminum will appear silvery gray. Bronze particles will have a gold shine. Ferrous particles will be dull and are often more discernable by dragging a magnet through the oil. Accumulation of all of these aforementioned particles will be normal in small quantities, however, excessive amounts of any of them could be cause for concern.

      Keep an eye out during oil changes for mettalic particles, particularly dark color, and a milky look.
      Engine Coolant
      Coolant contaminated with black specks can often be traced back to a leaking head gasket. Combustion byproducts are forced into the coolant system due to the high pressures in the combustion chamber during the combustion event. These black specks will often float and show themselves as soon as the radiator cap is removed. 

      Check your coolant for black specs, as that is often an indicator of a bad head gasket.
      Leak Down Testing
      Performing a leak down test on an engine is by far the most definitive diagnostic procedure that can be performed to determine the health of the piston rings, cylinder bore, valves, valve seats, and head gasket. If any of the previously mentioned symptoms are observed, a leak down test is almost always a great next step.
      A leak down test pressurizes the engine’s combustion chamber and compares the amount of pressure going into the combustion chamber to the pressure that is retained. Pressurized air is administered via the spark plug hole and two pressure gauges are used to make the comparison. The piston is positioned at top dead center on the power stroke. Air exiting the combustion chamber can then be traced back to the valves, head gasket, or piston rings.
      Find OEM+ quality piston kits and more top end components here.

      Performing a leak down test is a great indicator of the health of your piston rings, cylinder, head components, and gaskets.
      Many of the problems discussed here are commonly caused by worn top or bottom end parts. If you find that you're engine is displaying signs of worn piston rings, valve train components, or bearings, your first thought may be, "how much is this going to cost me?" Luckily, expensive, premium aftermarket brands and overpriced OEM parts are not your only option. For example, ProX Racing Parts has a catalog full of OEM-quality replacement parts, many of them made by OEM manufacturers, but priced more desirably. Depending on what you need to replace, affordable engine parts like piston kits, valves, cam chains, connecting rods, bearings, and gaskets can be found in the ProX catalog.
      Stay attentive for these signs of possible engine wear. It's always better to replace parts as preventative maintenance practice, and not because you're trying to fix something that is no longer functioning.
      Don't give up OEM+ quality just to save a few bucks. Get the best of both worlds and find everything you need for your bike at Pro-X.com.
       
      It's always better to err on the side of caution when deciding if your engine parts are worn enough to replace yet. ProX parts are a great option for staying within budget while retaining OEM quality.
      A couple other key points to keep in mind: discussing specific time intervals in regards to when things should be replaced is futile. The reason is simple: different engines, maintenance practices, and applications will all have different intervals. Installing an hour meter on your engine so that you can log the number of hours the engine has run can be one of the most insightful ways to establish maintenance and replacement intervals specific to your engine, riding, and maintenance habits.
      ProX Hour Meter


    • By Matyas
      Hello there, 
      Recently I noticed that my chain is rattling a bit around the front sprocket when I accelerate. I adjusted the chain slack to specs and lubed the chain and it got somewhat better but there's still a bit of a noise left. 
      I've been doing a good amount of work on the bike myself and I'm open to replace the chain and sprockets, but I don't want to if I don't have to. I can tell that the chain is no longer rounded and it's flat on the sides which is not a good sign but not sure about the sprockets.
      Can someone with a trained eye give me an idea based on the pictures if they definitely have to go or if they've got a decent amount of life left on them? 
      Thank you!


    • By Rob@ProX
      Chances are if you ride dirt bikes, ATVs, or operate any other wheeled powersports machine, you will eventually have to bleed your brakes. Brake bleeding in itself is not a difficult job, but there are a handful of tips and tricks that can make the process go more smoothly and result in better performing brakes.
      Servicing brake systems by replacing worn components as needed and refreshing the brake fluid periodically is a critical maintenance task that is often overlooked. In this article, we’ll provide an overview of the brake bleeding process and share some tips that can make the job easier. We’ll even provide a few pointers that can make rebuilding your master cylinder go more smoothly.
      From pads and rotors to master cylinder and caliper rebuild kits, check out ProX braking components here.

      Bleeding brakes is not only necessary when there's air in the line, it's also a normal maintenance task that should be performed periodically.
      The necessity to bleed your brakes may crop up for several reasons. The tell-tale signs that your brakes may need to be bled are reduced braking power, inconsistent braking, and sponginess felt in the lever. If any of these symptoms exist, it is always a good idea to check the integrity of the system. Leaks can occur as a result of loose banjo bolts, damaged seals, and cracked lines.
       
      If you're feeling sponginess in the lever or less braking power, be sure to check your brake lines and banjo bolts for damage and leaks.
       
      To start, it is always a good idea to consult your make and model’s factory service manual for information specific to the task at hand. Within your service manual, you’ll find torque specs, detailed procedures, and fluid information that can be important to take into consideration when performing the job.
      Unfortunately, brake fluid is a harsh chemical and should be treated as such. Both you and your machine can be adversely affected by inadvertent contact with brake fluid. When servicing your brakes and bleeding your lines, be sure to take any necessary precautions and avoid skin and eye contact. Wear rubber gloves and safety glasses when bleeding the brakes. If the brake lever is pump too quickly during the bleeding process fluid can be shot into the air from the reservoir. Brake fluid can strip paint and cloud plastics, so be sure to protect your machine’s surfaces with a towel or rags to limit exposure.

      Brake fluid is a very harsh chemical, be sure to protect yourself and your machine.
       
      Brake fluids used in automotive/powersports applications within the United States and many other parts of the world are divided into three classes. Specifications for the classes are outlined by the Department of Transportation (DOT). The commonly available fluid class options are DOT 3, DOT 4, and DOT 5.1. The majority of powersports applications utilize DOT 4 brake fluid. Usually, your machine’s brake fluid reservoir cover/cap on the front and rear master cylinder denotes which fluid is used. In general, mixing of brake fluid classes is not recommended because of compatibility reasons and differences in boiling point.

      The correct type of brake fluid for your machine should be noted both in your owner's manual and on the master cylinder cap. Do not use anything other than the recommended type.
       
      Prepare to bleed your brakes by positioning the front or rear master cylinder and reservoir as close to level as possible. When working on the front brakes, this often means turning the handlebars to one side or the other to achieve a level reservoir. Don’t forget to position towels or rags around the reservoir in case of a spill.

      Make sure your master cylinder is as level as possible to avoid spilling fluid. Wrap a rag around the master cylinder in case of an accident.
       
      Once situated, remove the reservoir cover or cap, depending on which system you’re working on. Reservoir cover screws can be prone to stripping, so proceed cautiously. Typically, flat head Japanese Industrial Standard (JIS) screws are used on Japanese equipment. While a Phillips bit is close in profile, it is not the right bit for the job and will more easily strip the fastener. Pick up a set of JIS screwdrivers or bits; otherwise, the tip of a Phillips bit can be ground down in a pinch so that the bit fits the JIS profile more closely.

      After the cover or cap has been removed, proceed to remove the diaphragm. The diaphragm may come off with the cap, so be careful not to drop or damage it.
       
      Transition to the caliper and remove any necessary covers or guards so that the bleeder valve is visible. The bleeder valve has a rubber cover that protects its flared nipple and should be easily identifiable. Size a clear piece of tubing so that it fits snuggly over the bleeder valve nipple and has at least six inches of length, or enough length to drain into a catch bottle.
       
      Remove the protective rubber cap from the bleeder valve and place a piece of clear, plastic tubing over it. Make sure it's snug and completely covering the flared end. The other end of the tubing should be placed into a catch bottle.
       
      To begin the bleeding process, squeeze the brake lever (front) or push the pedal down (rear), then open the bleed valve ¼ - ½ turn. A mixture of air and brake fluid should exit from the bleeder valve and be visible in the clear tube. Close the bleed valve. Next, slowly release the brake lever or pedal and allow it to remain at its original extended position for a few seconds before repeating the process.

      Squeeze the brake lever (front), then loosen the bleeder valve approximately 1/4 turn. Once the lever compresses all the way in to the grip, close the bleed valve, then release the lever. Repeat this process as necessary to work fluid/air out of the system.
      Keep a close eye on fluid levels in the reservoir. If all the fluid in the reservoir is consumed and air is sucked in, the whole process will need to be restarted. Add fresh brake fluid to the reservoir as necessary throughout the bleeding process to ensure no air ever gets sucked into the system. When adding brake fluid, be very careful to ensure no contaminants such as dust or debris enter the reservoir. Any small particles that find their way into the brake system can cause the system to malfunction or prematurely wear.
      Time to replace your brake pads or rotors too? Find quality, affordable brake components here.

      Keep the fluid level in the master cylinder high enough to avoid sucking air throughout the bleeding process. Using a plastic syringe is a great way to avoid spilling fluid when filling.
      The bleeding procedure outlined should be repeated until the mixture exiting the bleeder nipple consists entirely of brake fluid. This may take a short or long period of time depending on where and how much air is in the system. Once the brakes have been properly bled, a noticeable improvement in the feel of the brake lever or pedal should be felt when the brakes are actuated.

      Keep an eye on the clear tubing and bleed until there is nothing but clean brake fluid with no air bubbles exiting the bleed valve.
       
      Upon completion of bleeding the brakes, ensure the fluid level in the reservoir is at the upper level of the fill line. Then, carefully install the diaphragm, cover/cap, and any other remaining hardware. Be sure to double check that the bleeder valve is tight. Once the machine has been reassembled, test the brakes one final time by rolling the machine forward and backward and noting how responsive the brakes are. Assuming everything checks out, the machine should be test ridden.

      Once everything is put back together and re-tightened, test the brakes in the garage by just rolling the bike back and forth to make sure they are working properly before riding it.
      Perform a test ride by progressively increasing the machines speed and brake load. Do this based on brake performance and as you gain confidence in the brake system. Always pick a suitable test location and be sure to leave yourself ample room in case something goes amiss. Before performing high speed and load braking tests, stop the machine and check over the caliper, line, and master cylinder to ensure there are no leaks.
      Master Cylinder Tips
      If you continue to encounter problems with your brake system after bleeding or find worn out components in your master cylinder, it’s time to rebuild. Master cylinder rebuild kits make it easy and affordable to get your brakes performing again. The aftermarket is a good source for affordable rebuild kits for a job like this. ProX Racing Parts offers affordable master cylinder rebuild kits that contain OEM-quality parts, complete with all pieces necessary for a standard rebuild. Here’s a few tips to keep in mind during a master cylinder rebuild to ensure your job goes as smoothly as possible.
       Be sure to use a snap ring plier when removing the snap ring from the master cylinder. Attempting to extract the snap ring with anything else often leads to damaging the snap ring groove and surrounding geometry.
         Once the master cylinder has been completely disassembled, be sure to clean the entire master cylinder before reassembly. When cleaning the master cylinder, only use brake fluid.
         Check the master piston and cylinder bore for abnormal scratches. If deep scratches are present, the piston and cylinder should be replaced. Also, reference your service manual for any applicable inspection measurements that should be taken.
         Upon reassembly, be sure to apply new brake fluid to the master piston and master cylinder bore.
         When installing the boot, be sure that it fully seats.
      Should you encounter leaks or operational issues with your brake caliper, calipers can also be rebuilt and resealed. ProX offers caliper rebuild kits complete with new rubber boots, seals, bleeder caps, and retaining pins. All ProX components supplied in master cylinder and caliper rebuild kits are designed to OEM specifications to help ensure to the same longevity your machine’s brake system had when it was new.

      Should your brake caliper be leaking internally, caliper rebuild kits are also available to save money over buying a new caliper. Find caliper rebuild kits for your machine HERE.
       
    • By Adventurer_inside
      Hey guys,
      About 1.5 years ago, I rebuilt my 650 engine and installed a 100.5mm Pro-X piston, with the cylinder rebored accordingly. Everything seemed fine until a couple of weeks ago when I noticed my bike started producing blue smoke. I initially thought it might be the valve seals, even though I used brand-new OEM ones.
      After a recent trip, I found that my oil levels had dropped significantly, going from around 2L to just under 1L, which was a big red flag for excessive oil consumption.
      I decided to open up the top end, only to find the piston wobbling side-to-side, with clear wear in the bore. I was shocked since I followed the manual meticulously, using all the correct measurements. After removing the cylinder, I discovered the piston pin had chewed up the inner sides of the pin bores badly.
      Upon further inspection, I realized that the Pro-X piston lacks pin-bore lubrication holes—something OEM pistons have. It looks like this missing feature caused serious damage: overheating, metal-on-metal grinding, and overall destruction of the connecting rod bore and cylinder face.
      So now, I’m left wondering how this piston pin was supposed to get any lubrication in those bores. Do other brands, like WISECO, have similar issues, or do they include these lubrication holes?
      Here’s what I’m weighing:
      Connecting Rod: Replace the aftermarket Pro-X with an OEM one or stick with the Pro-X if it’s actually reliable.
      Piston Choice: Considering a WISECO 101mm or going with a 100mm sleeve and OEM piston. But I’m wary of facing the same problem I did with the Pro-X if the WISECO doesn’t have those crucial lubrication holes.
      I’d love to hear your thoughts on this, especially if you’ve used WISECO pistons or have had a similar experience. I’ve attached some photos to give you a better look at the damage.
      Thanks, everyone!

    • By Ches
      The infamous crf casing tab for front cam chain guide.. 
      It's an 05 450r, the cam sprocket fell off, the bolts were loose and had sheared.. made a right mess but a lucky escape for the engine. 
      Here's my quick fix for the said scenario.
      Fairly red neck but it will do the job..


×
×
  • Create New...