Jump to content
  • entries
    56
  • comments
    452
  • views
    278747

How Much Damage Can An Improperly Cared For Air Filter Cause?


Paul Olesen

15016 views

 Share

blog-0911698001461721419.png

I thought this week it would be a good idea to share with you an example of what can happen when dirt gets passed an engine's air filter. This will be a short post, but a picture is worth a thousand words. In my next post I’ll go into detail on how to properly care for your air filter to help ensure that this never happens to you.


The series of photos below shows a sad case where dirt has found its way into the engine and wreaked havoc. The photos are all from the KX250F I bought on the cheap with the sole intention of rebuilding the engine and documenting the process for my book, The Four Stroke Dirt Bike Engine Building Handbook. Honestly, I couldn’t have bought a better bike for the project, nearly everything on the bike was worn out or screwed up from the previous owner.


Here is how the air filter and airbox looked prior to disassembly.
index.php?app=core&module=attach&section=attach&attach_rel_module=post&attach_id=319871


Here is the back side of the air filter. The filter was completely dry. There was no grease on the sealing face of the filter or the airbox flange. In this particular case, dirt could have got into the engine through the filter or between the filter and sealing flange. The amount of dried mud in the airbox and on the bike also makes me suspicious that muddy water got into the engine instead of just dirt. I honestly can’t say for certain.


index.php?app=core&module=attach&section=attach&attach_rel_module=post&attach_id=319869


The airbox itself was also extremely dirty.


index.php?app=core&module=attach&section=attach&attach_rel_module=post&attach_id=319870


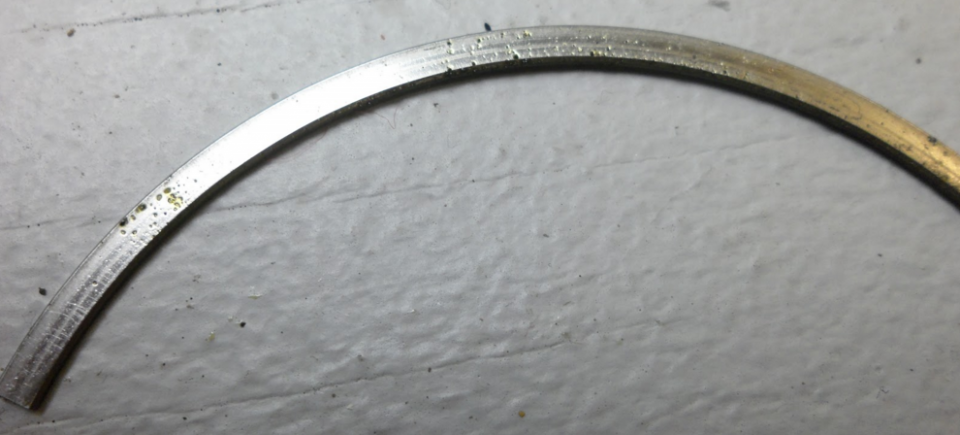
Once the engine was disassembled I carefully examined the piston assembly and cylinder bore. At first, I could not get any of the rings to move freely. Only after I had pounded a pick between the ring ends of the compression ring was I able to get the compression ring off. As I removed the compression ring, a load of sand came with it.


This photo of the compression ring doesn’t do the situation justice. Some of the dirt was actually removed from the ring as I handled it.
index.php?app=core&module=attach&section=attach&attach_rel_module=post&attach_id=319873


Here is a close up of the compression ring. Note all the grit!


index.php?app=core&module=attach&section=attach&attach_rel_module=post&attach_id=319874
index.php?app=core&module=attach&section=attach&attach_rel_module=post&attach_id=319875


The oil rings didn’t fair any better, were just as stuck, and had a lot of dirt on them.


index.php?app=core&module=attach&section=attach&attach_rel_module=post&attach_id=319876
index.php?app=core&module=attach&section=attach&attach_rel_module=post&attach_id=319877


Here you can see dirt inside the ring grooves and at the edges.


index.php?app=core&module=attach&section=attach&attach_rel_module=post&attach_id=319879
index.php?app=core&module=attach&section=attach&attach_rel_module=post&attach_id=319880


Here is dirt I rubbed off the oil rings.


index.php?app=core&module=attach&section=attach&attach_rel_module=post&attach_id=319881


Miraculously (and fortunately for me) whether the engine sucked in dirty air or water, it happened quickly and stuck the rings to the piston so they could no longer seal correctly, and the engine subsequently lost compression and power in a hurry. This speculation is based on the fact that the cylinder bore showed no signs of excessive wear or damage and it measured well within the service limits. This is an outcome I never though possible and is hard to believe.


I hope you enjoyed this brief write up on the damage that can result from ingesting dirt, whether from abnormal circumstances such as dropping a running engine into a mud hole or simply neglecting to take care of the air filter when running the engine in dusty conditions. In my next post I’ll show you how to care for and install your filters so these problems don’t happen to you! Questions or comments are always welcome and I enjoy hearing from you all!


-Paul
https://www.diymotofix.com/


If you like my blog, click the "Follow this blog" button in the upper right. You must be registered to do this.

Screen Shot 2016-04-25 at 8.39.00 AM.png

Screen Shot 2016-04-25 at 8.42.31 AM.png

Screen Shot 2016-04-25 at 8.42.16 AM.png

Screen Shot 2016-04-25 at 8.44.20 AM.png

Screen Shot 2016-04-25 at 8.44.28 AM.png

Screen Shot 2016-04-25 at 8.44.41 AM.png

Screen Shot 2016-04-25 at 8.44.50 AM.png

Screen Shot 2016-04-25 at 8.44.57 AM.png

Screen Shot 2016-04-25 at 8.40.17 AM.png

Screen Shot 2016-04-25 at 8.40.26 AM.png

Screen Shot 2016-04-25 at 8.40.35 AM.png

Screen Shot 2016-04-25 at 8.40.43 AM.png

  • Like 11
 Share

19 Comments


Recommended Comments

I have a few questions, I have always been cleaning my air filter with gasoline and then using K&N cleaner. Does using gas mess up the filter in any way? Another question is what is the best way to clean out the air box? I have an 04 ktm 125sx with the air box on the side. Thanks in advance

  • Like 1
Link to comment

I have a KTM 250 EXC, I clean my filter with petrol/gasoline first to clean heavy dirt then hot water with Ariel, Persil, Tide, any detergent I find in the house.

Link to comment

i always used Spray nine cleaner/degreaser or purple power with hot water, it doesn't break the filter down overtime. I was able to maintained the same air filter for over 6 years on my last bike (04 yz250f). 

Link to comment

I use no toil air filter cleaner, been using it for years in a bucket of warm water, always worked great!


+1


And their oil plus grease on the sealing surface

Link to comment

I have a few questions, I have always been cleaning my air filter with gasoline and then using K&N cleaner. Does using gas mess up the filter in any way? Another question is what is the best way to clean out the air box? I have an 04 ktm 125sx with the air box on the side. Thanks in advance

Just before an enduro many years ago I remembered I hadn't cleaned my filter so took it off and used the old gasoline approach. Then to dry it quickly I held it in the warm exhaust of my motorhome hot water heater. You guessed it, it burst into flames. I threw it in the Bellingham mud and stomped out the flames while my riding partner almost died from laughing so hard he couldn't breathe. I had to pick off the mud, crud and fused foam which was like lizard skin on the outside. First enduro I ever won my class in. So, yeah, cleaning with gas works but don't be an idiot like me. 


For the air box, Formula 409 from a spray bottle and that T shirt with the ragged collar you should have cut up for rags years ago. 

Start by tucking a clean piece of it into your carb intake first to keep crud out of there. 

I keep a spray bottle of 409 by my shop sink and wash my greasy paws with it too. 

Link to comment

Ah, the joys of 4-strokes! Everything ingested is confined to above the piston rings - 'the cylinder bore showed no signs of excessive wear or damage and it measured well within the service limits' - just how it's designed to be! Imagine if this had been a 2-stroke! Anybody remember carb trumpets with tea-strainers over the end?!

Link to comment

I only use FFT filter oill and water proof grease on the lip. It works great. I've never had dirt get past the filter using FFT. When my boys where racing four strokes I would use a strainer when filling up to keep dirt out of the gas tank. I just bought a 125 it had poor filter maintenance . The cases are now split getting a new crank and a 139 kit.

Link to comment

Ah, the joys of 4-strokes! Everything ingested is confined to above the piston rings - 'the cylinder bore showed no signs of excessive wear or damage and it measured well within the service limits' - just how it's designed to be! Imagine if this had been a 2-stroke! Anybody remember carb trumpets with tea-strainers over the end?!


I saw a lot of those on chopped Triumphs and BSAs long ago.  They called them velocity stacks.  I would see a lot of them when they showed up at my place with a worn, smoking top end.  

Link to comment

I've been cleaning filters for 30 years, always a PITA, no way around it but this might help out a little....


1. Get at least 3 filters and do this to all 3 at a time rather than one at a time

2. Get 2 cheap plastic paint buckets with lids at home depot, keep them for filters only

3. Put on your Dr. Jekyl mad scientist elbow high gloves and nasty apron

4. Dunk and squish in bucket of kerosene - never had a problem with glue failure - when done, let dirt settle out and pour kerosene back into gallon can for next time, use a funnel with a filter sock over it to strain dirt or try to leave dirt in bucket to dispose of. The dirt will settle out in the can, just don't shake the kerosene can the next time you pour it into the bucket. You can transfer it into milk jugs as well.

5. Soak filters in bucket of dawn (cheapest and best) grease cutting dish soap, smooosh them around for as long as possible, a ton of small particles will come out.

6. Rinse in super hot water many times, kitchen sink works because you can see any fine particles still coming out. Make sure the wife/girlfriend/mistress(s) are away, do the dishes afterward just in case you get caught or managed to get a smart one

7. Dry with hair dryer or air dry overnight in breeze - filters, not woman(s)

8. Use one of your home depot paint buckets already filled with filter oil and dunk it in half way

9. Use the sic-asss gloves to scare (or impress) your neighbors and then smoosh the oil into the entire filter, cover yourself in a haz-mat suit  because no matter how hard you try, that sh_t will end up on your new Yeezy's and your favorite cargo shorts with the asss ripped open

10. squeeze-n-hold, over and over and over - filters, not tool

11. once oil appears to be uniform throughout the filters, use heavy duty, shop grade, paper towels and wrap several together around the filters and ....squeeze-n-hold, over and over and over, removing as much oil as possible.

12. Store the filters in large zip-locks, hang them in garage, excess oil may drip out over time, put paper towel in bottom corner to absorb oil

13. Cover buckets for next time, leaving filter oil in there, or funnel back into quart container

14. Store mad scientist gloves in zip lock bag

15. Rig zip-tied plastic cover over airbox to prevent direct mud splashes for openings around seat, of course leave lots of air openings, just try to block large openings a little Sometimes I put a huge chunk of pourous foam in the top of the airbox to catch the big stuff, recently I have put some of that pillow case stuff in a filter sock and laid it over the top of the airbox. I have also stretched the filter sock over the entire top of the airbox. Whatever, you get the point.

16. Instead of filter socks, I use swimming pool skimmer socks, cheap and easy, reusable, clean in kerosene as well, oil them up too. Get um in pack of 6 at Lowes or HD.

17. Send me money for these wonderful tips :-)


Oh, forgot to mention, drink 3 beers, no more, no less, before attempting any of the above.


Godspeed my friends, and remember, it will be my roost hitting you in the face because my filters are cleaned properly.

  • Like 5
  • Helpful 2
Link to comment

keeping your air filter clean is cheap insurance and a  lot cheaper than a new engine for sure. the same for your engine oil. i like to use "NO TOIL" filter cleaner and oil. its biodegradable and used with warm water. I've been using it for years and it works great. I'm old school so i always put a thin coating of grease around the sealing flange, also by "NO TOIL" absolutely no problems weigh this method. hope someone can use this info.

  • Like 1
Link to comment

I also use No Toil. I have two filters I rotate. It is so easy since you are just using (soap) and water I find myself doing it often. 1 day of dusty riding at Taneum and such and I change the filter.

Link to comment

moshman had a lot of good advice here.  I have used gasoline instead of kerosene with great success, you just have to remember what you are dealing with and the hazards involved.  Wear the right gloves, no sparks/sources of ignition etc.  It only takes a small amount in a plastic tub to release the filter oil, then move to the dawn and hot water as previously mentioned.


The filter in the picture doesn't look all that dirty to me, as far as the condition of the outside.  I suspect the suggestion muddy water was washed through, is the main culprit to letting dirt through.  If this is the case, a foam air filter is simply not designed to stop muddy water from entering the engine, regardless of how well its oiled or greasing of the seal.


Cleaning filters every ride is many times overkill.  Common sense works here...if it was a very dusty ride, it likely needs it.  If damp/wet/muddy, it might still look very good even after several rides.  Every time you remove the filter to clean, you stand a chance of getting dirt into the boot.  I tend to clean away the dirt in the area above the filter, and on the side rails of the subframe, prior to removing the dirty filter to reduce the chance of contamination.  For the rest of it, it feels good to clean away but really doesn't affect much.


Regarding putting grease around the sealing surface, this only matters if something is significantly out of flat between the filter cage and the airbox.  You can check this out but putting the cage in without the filter.  Otherwise, think about it...the foam is very compressible and will seal fine just with the oil that's on it.  There are certain bikes where I use grease to be safe, depending on the design and my confidence.  Hondas in the early 2000s had issues here if I remember right.


I have been known to put grease on the inside of the air boot, this will catch particles that make it past the filter in the event of a suspected problem (such as the muddy water) or anything that falls in when the filter is removed, and is somewhat of a tell-tale.


Add one more vote for FFT...it's messy, goey stuff to work with but I've had great results with it.  I find it hard to believe anything soap/water soluable is going to trap particles as well, but could be wrong...call me old school.  Have tried the spray on stuff as well but don't see the point, it needs to be worked completely through the thickness/layers anyway.

  • Like 1
Link to comment

Nobody has mentioned filterskins. I've been rotating 3 skins between 2 bikes for about a year with great success. Filter maintenance is dramatically reduced.

Also been using NoToil for a couple of years and love it. Just did rings on 1 of the bikes and no sign of any dirt inside or in the boot/carb.


cheers

  • Like 1
Link to comment

Nothing beats Maxima FFT filter oil for particle retention tackiness... Sticks to the filter without draining... And holds dirt like glue...


Next up... Maxima Pro-Filters... For about 10bux you can get a FFT pre oiled dual density filter complete with plastic gloves to keep your hands clean.... (I typically add some more FFT oil to the bag and work it in , even though it's pre oiled)


A more painless air filter experience, you cannot have....

Link to comment

My brother says greasing the lip is old school and doesn't need to be done. I not only grease the lip but also the in side surface of the air box.  I've also sealed a tear or 2 in an emergency and have had good luck with both K&N and foam, old school or not, in 47 years I have only one air filter related incident when filter fell off of my '74 YZ 125 during a Hare Scramble.

Link to comment

I once bought an RM250 2 cycle used.  The guy told me it was serviced and ready to roost.   I took the airbox door off and it had a sweat sock as a filter !! 

  • Haha 2
Link to comment

Create an account or sign in to comment

You need to be a member in order to leave a comment

Reply with:

×
×
  • Create New...